타입스크립트를 사용한 웹 프로젝트6
댓글창 만들기
이번에는 클라이언트에 댓글 시스템을 추가하고, 휴대폰에서 클라이언트에 접속해 댓글을 보내면 컴퓨터에 알림이 오도록 구현해보겠다.
TossoDetails.tsx에 아래와 같이 댓글창을 만들자.
1
2
3
4
5
6
7
8
9
10
11
12
13
14
15
16
17
18
19
20
21
22
23
24
25
26
27
28
29
30
31
32
33
34
({isEdit?...} 바로 아래에)
<div className={styles.commentsContainer}>
    <h4>comments</h4>
    <div>
        {commentArray.map((c) => {
            return (
                <div className={styles.commentsWrapper}>
                    <span>{c.content}</span>
                    <button
                        className={styles.commentsDeleteBtn}
                        onClick={() => {
                            return deleteComment(c.id);
                        }}>
                        x
                    </button>
                </div>
            );
        })}
    </div>
    <input
        className={styles.input}
        placeholder="비난,비방,욕설 등은 제재됩니다"
        onChange={(e) => {
            return setComment(e.target.value);
        }}
    />
    <button
        className={styles.commentBtn}
        onClick={() => {
            return saveComment((singleTosso as any).id);
        }}>
        Push
    </button>
</div>
댓글 관련 스테이트와 함수도 만들어주자.
1
2
3
4
5
6
7
8
9
10
11
12
13
14
15
16
17
18
19
20
21
22
23
24
25
26
27
28
29
30
31
32
33
34
35
36
(return 바로 위에)
const [commentArray, setCommentArray] = useState([]);
// 댓글 불러오기
const getComments = (id) => {
    const subcol = collection(dbInstance, id, 'comments');
    getDocs(subcol).then((data) => {
        setCommentArray(
            data.docs.map((item) => {
                return { ...item.data(), id: item.id };
            }),
        );
    });
};

const [comment, setComment] = useState('');
// 댓글 저장하기
const saveComment = async (id) => {
    const subcol = collection(dbInstance, id, 'comments');
    await addDoc(subcol, {
        content: comment,
    });
    getComments(id);
    getAlert(comment);
};

// 댓글 삭제하기
const deleteComment = async (comid) => {
    const targetdoc = doc(
        dbInstance,
        (singleTosso as any).id,
        'comments',
        comid,
    );
    await deleteDoc(targetdoc);
    getComments((singleTosso as any).id);
};
css도 추가하자.
1
2
3
4
5
6
7
8
9
10
11
12
13
14
15
16
17
18
19
20
21
22
23
24
25
26
27
28
29
30
31
.commentsContainer {
  display: flex;
  flex-flow: column nowrap;
}

.commentsWrapper {
  display: flex;
  flex-flow: row nowrap;
  justify-content: space-between;
  border-bottom: 1px solid rgb(119, 27, 27);
}

.commentsDeleteBtn {
  background-color: white;
  border: none;
  cursor: pointer;
}

.commentsDeleteBtn:hover {
  background-color: rgb(119, 27, 27);
  color: whitesmoke;
}

.commentBtn {
  width: 15rem;
  height: 2rem;
  background-color: rgb(119, 27, 27);
  color: whiteSmoke;
  border: none;
  cursor: pointer;
}
이제 실행해보면?
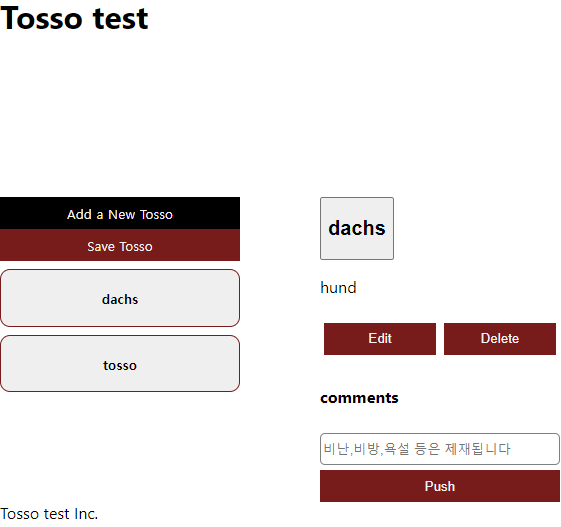
댓글창이 추가되었다!
댓글을 한번 입력해보고 Push 버턴을 눌러보자.
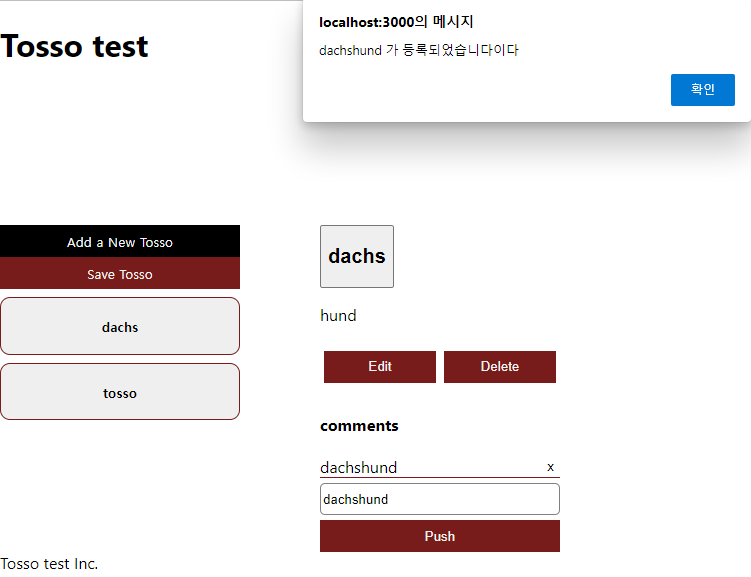
댓글이 등록되고 알림이 온다!(백그라운드였으면 알림창 대신 알림이 왔을 것이다)
한번 파이어스토어 서버에 이게 어떻게 등록되어 있는지 살펴보자.
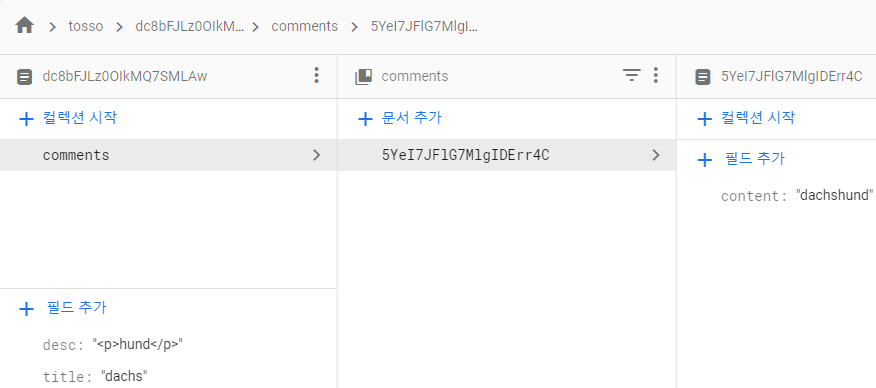
보다시피 문서 안에 콜렉션이 생성되고, 거기에 문서가 들어있는 것을 볼 수 있다.
이는 saveComment 함수에서 그렇게 하라고 했기 때문이다.
1
2
3
4
5
6
7
// dbInstance라는 콜렉션에서 id로 문서를 찾고, 거기에 comments는 하위 콜렉션 생성
const subcol = collection(dbInstance, id, 'comments');
await addDoc(subcol, {
  content: comment, // 하위 콜렉션에 문서 작성
});
getComments(id); // 해당 문서의 댓글 최신화
getAlert(comment); // 댓글이 왔다는 알림보내기
여기
참고로 getComments 함수도 살펴보면
1
2
3
4
5
6
7
8
9
10
// 마찬가지로 해당 id 문서의 comments 하위 콜렉션 찾기
const subcol = collection(dbInstance, id, 'comments');
// 거기서 문서 다 뽑아낸 후 commentArray에 저장
getDocs(subcol).then((data) => {
  setCommentArray(
    data.docs.map((item) => {
      return { ...item.data(), id: item.id };
    })
  );
});
댓글이 표시되는 html도 잘 보면
1
2
3
4
5
6
7
8
9
10
11
12
13
14
15
16
<div>
    {commentArray.map((c) => {
        return (
            <div className={styles.commentsWrapper}>
                <span>{c.content}</span>
                <button
                    className={styles.commentsDeleteBtn}
                    onClick={() => {
                        return deleteComment(c.id);
                    }}>
                    x
                </button>
            </div>
        );
    })}
</div>
commentArray에서 각 항목당 content 키값을 출력한다.
button은 해당 댓글 id인 문서를 찾아 삭제하는 deleteComment 함수를 실행시킨다.
문서를 이동할 때마다 해당 문서의 댓글이 출력되도록 getsingleTosso 함수를 수정해주자.
1
2
3
4
5
6
7
8
9
10
async function getSingleTosso() {
  if (id) {
    const singleTosso = doc(database, 'tosso', id);
    // getDoc은 특정 문서(doc객체)만 받아오는 것
    const data = await getDoc(singleTosso);
    setSingleTosso({ ...data.data(), id: data.id });
    // eslint-disable-next-line @typescript-eslint/no-use-before-define
    getComments(id); //여기에 추가
  }
}
알림 보내기
유튜브 댓글 기능처럼 다른 사람이 댓글을 달면 나한테 알림이 오도록 설정해보자.
다만 이를 제대로 구현하려면 로그인 기능을 구현해야 하므로
당직의 컴퓨터와 휴대폰이 각각 다른 사용자라 취급하고 설정해보자.
api 서버로 이동하여 “/fcm” api를 수정하자.
1
2
3
4
const message = {
    ...
    token:`컴퓨터의 토큰값(웹서버 실행하여 F12로 확인)`,
  };
토큰값만 당직 컴퓨터의 토큰값으로 바꿔주면 된다.
토큰 확인하는 방법은 여기서
다만 웹서버와 api서버의 npm run dev는 로컬호스트 실행이라 휴대폰에서 접근이 불가능하다.
이럴 때 ngrok을 활용하면 휴대폰에서도 로컬호스트에 접근할 수 있다!
두 서버를 실행한 후, ngrok이 깔린 위치에서 cmd창을 실행한 뒤
1
ngrok http -region=jp (서버 포트-기본 8000)
한번 더 cmd창을 열어
1
ngrok http -region=ap (클라이언트 포트-기본 3000)
이렇게 하면

이렇게 두 창이 나온다! 포트를 네트웤상에 열어 같은 네트웤이라면 http 또는 https으로도 접속 가능하게 하는 원리이다.
다만 이렇게 하면 보안상 취약해지므로 계속 켜놓지는 말자.
fcm 메세지는 로컬호스트 또는 https 환경에서만 작동하므로
클라이언트에서 서버로 보내는 주소를 수정한다.
1
2
3
4
(getAlert함수)
axios({
    url: 'https://53bd-121-166-111-58.ap.ngrok.io/fcm' // 서버의 ngrok주소
    ...
휴대폰에서 클라이언트의 ngrok 주소로 접속한다. 마찬가지로 댓글을 입력한 뒤 Push 버튼을 누르면…
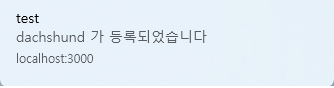
이렇게 컴퓨터에서 알림이 온다!