봄링크 게임3-기초 FE구현
웹프론트 생성
2번에서 했던 내용을 웹브라우저 상에서 표현하기 위해, 넥스트 JS(Next.js) 프로젝트를 생성하겠다.
넥스트 JS가 뭐냐면 여기로~
이렇게 bomblink_web이라는 웹 프로젝트를 생성하였다.
여기서 pages 밑에 화면을 보여줄 테스트 페이지인 test.tsx 파일을 생성한다.
넥스트(리액트) 특성상 pages 폴더에 있는 파일은 (주소)/(파일이름) 으로 접속하면 보여진다.
기본 UI구현
1
2
3
4
5
6
7
8
9
10
11
12
import React, {useState, useEffect} from 'react';

export default function Test({ data }) {

  const [board,setBoard] = useState(data);
  const [cursor, setCursor] = useState([parseInt(board.length/2),1]);
  const [cellColors, setCellColors] = useState({
    [`${cursor[0]}-${cursor[1]}`]: 'yellow'
  });

  ...
}
우선 변수부터 설명하자면
- board는 게임보드가 담기는 2차원 배열이다. 기본값은 data이다(아래에서 설명)
- cursor는 현재 선택 위치이다. 기본값은 board의 비어있는 공간을 제외한 가장 오른쪽 위이다.
- cellColors는 보드 내 각 요소(폭탄)의 색깔을 지정하는 키-값 변수이다. 키는 “(행)-(열)” 형식의 문자열로 되어 있다. 기본값은 cursor의 초기값 위치를 yellow로 정한다.
이를 활용하여 jsx를 아래와 같이 작성하였다.
1
2
3
4
5
6
7
8
9
10
11
12
13
14
15
16
17
18
19
20
  return (
    <div>
      <h1>This is the Test</h1>
      <table>
        <tbody>
            {board.map((row: Array<string>, idx: number) => (
                <tr key={idx}>
                    {row.map((val: string, idx2: number) => {
                        const cellKey = `${idx}-${idx2}`;
                        const cellColor = cellColors[cellKey] || 'white';
                        return (
                        <td key={cellKey} style=>{val}</td>
                        )
                    })}
                </tr>
            ))}
        </tbody>
      </table>
    </div>
  );
핵심은 table 태그인데, tbody에 2중 map을 사용하여 2차원 배열의 각 요소(td)마다 키값(cellKey), 색값(cellColor)을 지정해주었다.
여기서 cursor 위치에 있지 않는 요소는 색이 white로 설정된다. 즉 cellKey가 cursor값과 같은 요소는 cellColors[cellKey] 색인 것!
그 다음, 프롭스를 사용해 서버로부터 게임보드를 받아와 data로 콤포넌트에 넘기는 함수를 만들었다.
1
2
3
4
5
6
7
8
9
10
export async function getServerSideProps() {
  try {
      const response = await axios.get('http://127.0.0.1:8000/test');
      const data = response.data.board;
      return { props: {data} };
  } catch (error) {
      console.error(error);
      return { props: {data: []} };
  }
}
참고로 API 코드는 아래와 같이
1
2
3
4
5
6
7
8
class TestAPI(APIView):
    def get(self,request):
        global game
        game = Game(int(request.query_params.get('x',5)), int(request.query_params.get('y',10)))
        return Response(data={
            "time" : '1',
            "board" : game.printGame()
        },status=status.HTTP_200_OK)
API에 게임보드 크기 파라메타를 지정해주지 않으면 기본 5x10 크기로 생성된다.
응답 데이타의 board 키에 게임보드가 저장되어 있어 이를 data로 Test 콤포넌트로 보내면
화면이 최초 렌더링될 때 서버→data→board 순으로 게임보드 값이 전달되는 것이다.
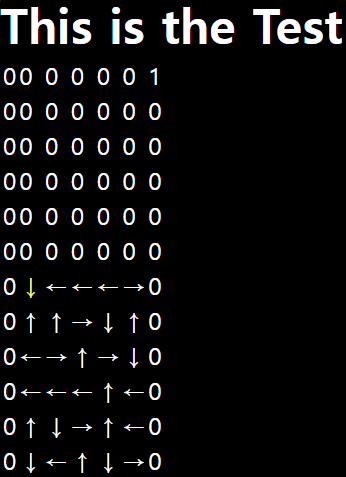
서버와 클라이언트를 모두 켜고 http://localhost.com:3000/test 로 접속해 보면 다음과 같이 나온다!
다음 시간에
다음 시간에는 커서를 이동하고 회전, 폭탄을 내리는 백엔드 구현을 작성해보겠다.